학습을 위해 참고한 사이트
https://learnopengl.com/Getting-started/Textures
LearnOpenGL - Textures
Textures Getting-started/Textures We learned that to add more detail to our objects we can use colors for each vertex to create some interesting images. However, to get a fair bit of realism we'd have to have many vertices so we could specify a lot of colo
learnopengl.com
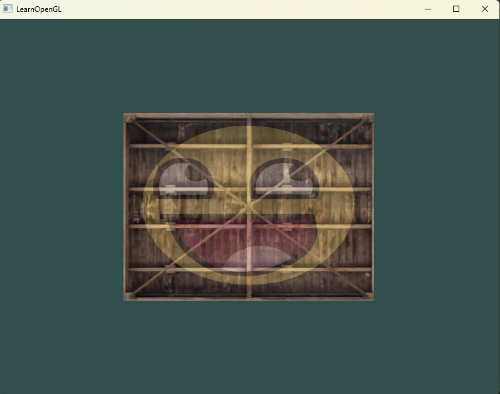
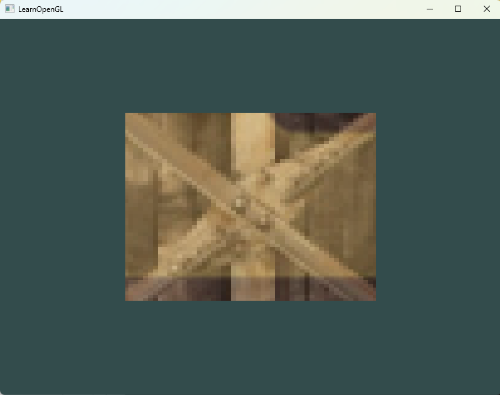
1. 프래그먼트 셰이더를 수정하여 웃는 얼굴을 좌우 대칭시키기

#version 330 core
out vec4 FragColor;
in vec3 ourColor;
in vec2 texCoord;
uniform sampler2D texture1;
uniform sampler2D texture2;
void main()
{
FragColor = mix(texture(texture1, texCoord),
texture(texture2, vec2(1 - texCoord.x, texCoord.y)), 0.2);
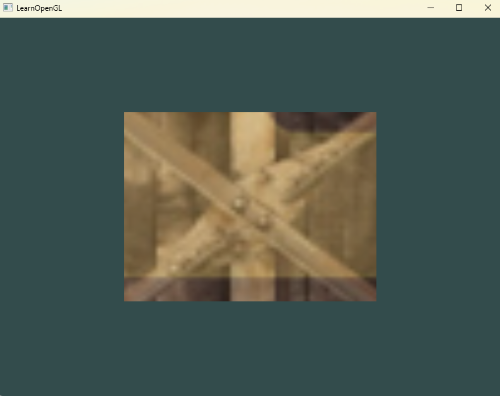
}2. 0.0~1.0f 대신 0.0~2.0f의 텍스쳐 좌표 범위를 사용해서 다양한 텍스쳐 랩핑 방법 시도해보기
texture coords를 0.0~2.0f로 수정
float vertices[] = {
	// positions			// colors			// texture coords
	 0.5f,  0.5f, 0.0f,		1.0f, 0.0f, 0.0f,		2.0f, 2.0f,
	 0.5f, -0.5f, 0.0f,		0.0f, 1.0f, 0.0f,		2.0f, 0.0f,
	-0.5f, -0.5f, 0.0f,		0.0f, 0.0f, 1.0f,		0.0f, 0.0f,
	-0.5f,  0.5f, 0.0f,		1.0f, 1.0f, 1.0f,		0.0f, 2.0f
};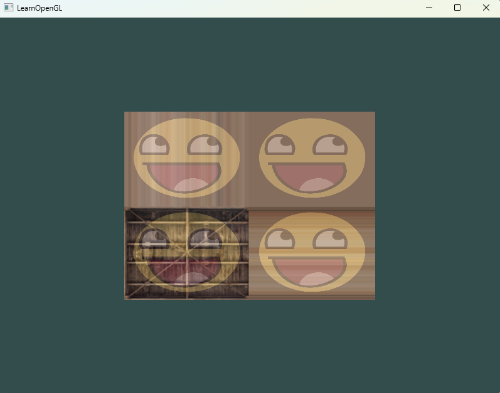
// container.jpg
glTexParameteri(GL_TEXTURE_2D, GL_TEXTURE_WRAP_S, GL_CLAMP_TO_EDGE);
glTexParameteri(GL_TEXTURE_2D, GL_TEXTURE_WRAP_T, GL_CLAMP_TO_EDGE);
// awesomeface.png
glTexParameteri(GL_TEXTURE_2D, GL_TEXTURE_WRAP_S, GL_REPEAT);
glTexParameteri(GL_TEXTURE_2D, GL_TEXTURE_WRAP_T, GL_REPEAT);
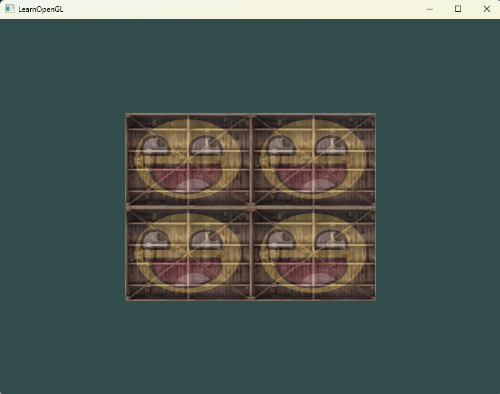
// container.jpg, awesomeface.png
glTexParameteri(GL_TEXTURE_2D, GL_TEXTURE_WRAP_S, GL_REPEAT);
glTexParameteri(GL_TEXTURE_2D, GL_TEXTURE_WRAP_T, GL_REPEAT);
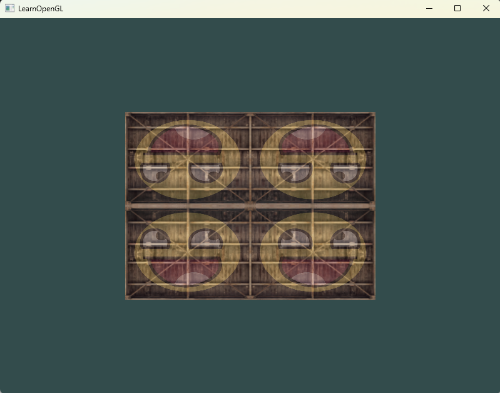
// container.jpg, awesomeface.png
glTexParameteri(GL_TEXTURE_2D, GL_TEXTURE_WRAP_S, GL_MIRRORED_REPEAT);
glTexParameteri(GL_TEXTURE_2D, GL_TEXTURE_WRAP_T, GL_MIRRORED_REPEAT);
3. 텍스쳐 좌표를 수정하여 텍스쳐의 중앙 픽셀(확대된) 매핑 후, GL_NEAREST, GL_LINEAR 샘플링 옵션 적용시키기
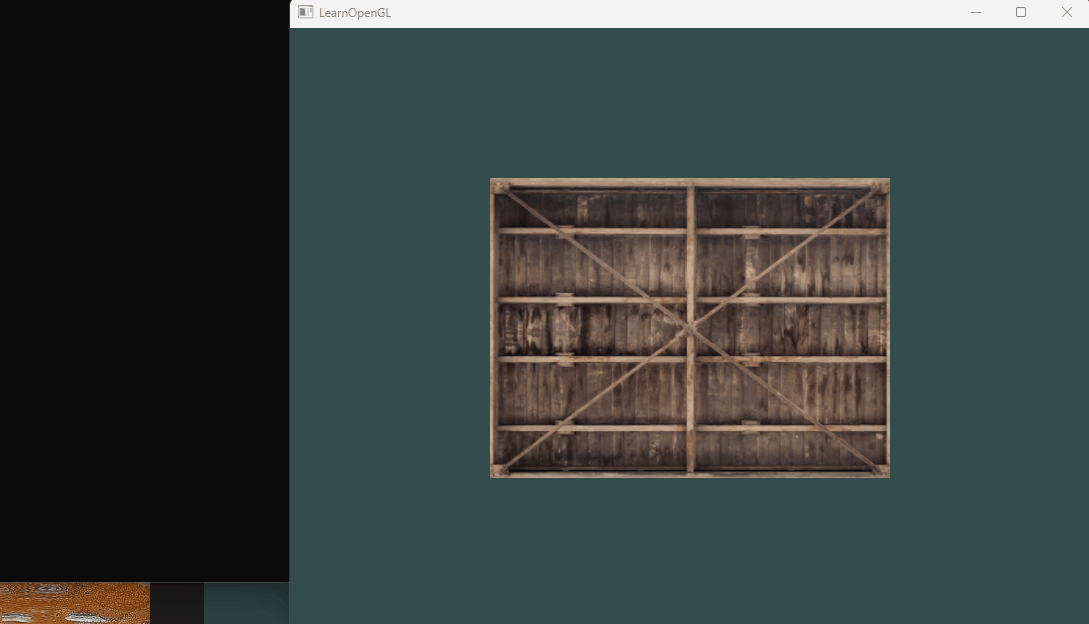
좁은 영역의 텍스쳐가 매핑되도록 텍스쳐 좌표를 수정
float vertices[] = {
	// positions			// colors			// texture coords
	 0.5f,  0.5f, 0.0f,		1.0f, 0.0f, 0.0f,		0.55f, 0.55f,
	 0.5f, -0.5f, 0.0f,		0.0f, 1.0f, 0.0f,		0.55f, 0.45f,
	-0.5f, -0.5f, 0.0f,		0.0f, 0.0f, 1.0f,		0.45f, 0.45f,
	-0.5f,  0.5f, 0.0f,		1.0f, 1.0f, 1.0f,		0.45f, 0.55f
};
glTexParameteri(GL_TEXTURE_2D, GL_TEXTURE_MAG_FILTER, GL_NEAREST);GL_NEAREST 옵션 적용 시 텍스쳐의 확대로 인해 픽셀이 드러나는 것을 확인할 수 있다. 이 경우 픽셀의 색상을 결정할 때 주변 텍스쳐 픽셀의 색을 반영하여 좀 더 매끄럽게 나타나도록 해주는 GL_LINEAR 옵션을 사용해보자.
glTexParameteri(GL_TEXTURE_2D, GL_TEXTURE_MAG_FILTER, GL_LINEAR);선명도는 다소 낮아졌지만, 텍스쳐의 픽셀로 인한 부자연스러움은 어느정도 사라진 것을 확인할 수 있다.
4. Uniform 변수를 사용하여, 키보드의 up, down 입력으로 두 텍스쳐의 혼합(mix 함수) 비율 조절하기
입력을 감지하는 콜백 함수인 processInput 수정
float ratio = 0.0f;

/*
...
*/

void processInput(GLFWwindow* window)
{
	if (glfwGetKey(window, GLFW_KEY_ESCAPE) == GLFW_PRESS)
	{
		std::cout << "Pressed ESC" << std::endl;
		glfwSetWindowShouldClose(window, true);
	}
	else if(glfwGetKey(window, GLFW_KEY_UP) == GLFW_PRESS)
	{
		if (ratio <= 1.0f)
		{
			std::cout << "Pressed UP" << std::endl;
			ratio += 0.0003f;
			printf_s("Current ratio : %.2f\n", ratio);
		}
	}
	else if (glfwGetKey(window, GLFW_KEY_DOWN) == GLFW_PRESS)
	{
		if (ratio > 0.0f)
		{
			std::cout << "Pressed DOWN" << std::endl;
			ratio -= 0.0003f;
			printf_s("Current ratio : %.2f\n", ratio);
		}
	}
}
또한 렌더링을 수행하는 반복문에서 방향키 입력에 따라 변화된 ratio값을 glUniform1f 함수를 통해 값을 프래그먼트 셰이더로 넘겨주도록 한다.
while (!glfwWindowShouldClose(window)) {
	// 입력 감지
	processInput(window);

	// 렌더링 명령 ...
	glClearColor(0.2f, 0.3f, 0.3f, 1.0f);
	glClear(GL_COLOR_BUFFER_BIT);

	// awesomeface.png는 Alpha값도 사용하므로, blend 옵션을 활성화
	glEnable(GL_BLEND);
	glBlendFunc(GL_SRC_ALPHA, GL_ONE_MINUS_SRC_ALPHA);

	glActiveTexture(GL_TEXTURE0);
	glBindTexture(GL_TEXTURE_2D, texture1);
	glActiveTexture(GL_TEXTURE1);
	glBindTexture(GL_TEXTURE_2D, texture2);

	glUniform1f(glGetUniformLocation(ourShader.ID, "ratio"), ratio);

	glBindVertexArray(VAO);
	glDrawElements(GL_TRIANGLES, 6, GL_UNSIGNED_INT, 0);

	// 렌더링 명령 ...

	glfwSwapBuffers(window);
	glfwPollEvents();
}
마지막으로, 프래그먼트 셰이더에 새로운 유니폼 변수를 추가하여, mix 함수 동작 시 유니폼 변수가 파라미터가 되도록 설정한다.
#version 330 core
out vec4 FragColor;

in vec3 ourColor;
in vec2 texCoord;

uniform float ratio;
uniform sampler2D texture1;
uniform sampler2D texture2;

void main()
{
	FragColor = mix(texture(texture1, texCoord),
					texture(texture2, texCoord), ratio);
}
'컴퓨터그래픽스' 카테고리의 다른 글
| [OpenGL 공부] Coordinates Systems (2) | 2024.02.01 |
|---|---|
| [OpenGL 공부] Transformations (0) | 2024.01.20 |
| [OpenGL 공부] Textures (2) (1) | 2024.01.15 |
| [OpenGL 공부] Textures (1) (1) | 2024.01.13 |
| [OpenGL 공부] Shader (0) | 2024.01.13 |


